Work with JSON files in the iOS document directory
In today’s post, I’m going to demonstrate how to read data from and write data to a local JSON file.
The source code of this post is available here.
Environment: iOS 16.2, Xcode 14.2.
Overview
We’re going to look at how to read/write json data by creating two functions to read and write data separately, then we’ll create a User model with properties such as id and name and try to save an array of users to a JSON file in the document directory, and finally read the JSON file.
Step 1 - Create a function to read a JSON file
(The code is provided step by step; scroll down to the end of step 1 for the complete function.)
Reading a JSON file contains three subtasks:
Get the file path. For this demo, we’ll use the iOS document directory.
Get the data from the JSON file.
Decode the data, which means converting data to Swift objects.
Let’s get coding. First, define a read function. This function should be generic so that it can parse JSON that can contain any model. Please note that a model struct must conform to Decodable (or Codable) to be parsed. To make the function generic, we can add <T: Codable> after the function name and define the return type T? , which means that the return type could be any type that conforms to Codable. Also, we need a parameter filename to let the program know which file to process.
func read<T: Codable>(filename: String) -> T? {}
Now let’s work on subtask 1: get the file path.
Define a variable called file of type URL to hold the file URL because we need to convert the file name string to a URL for data fetching. Then assign the file with the value from FileManager.default.url(for: .documentDirectory, in: .userDomainMask, appropriateFor: nil, create: true) .appendingPathComponent(filename) . Wrap this line with a do-catch since it might throw an error. FileManager is a class from Swift Foundation, which, as its name suggests, makes it easier for us to work with files.
default is a static instance of this class and this url function returns a URL where a file is located. .documentDirectory is one of the file paths we can work with in iOS; there’re other paths such as application, library, caches, downloads etc. And .appendingPathComponent append the file name we pass into the function at the end of the file path as a URL.
var file: URL
do {
    file = try FileManager.default.url(for: .documentDirectory, in: .userDomainMask, appropriateFor: nil, create: true)
            .appendingPathComponent(filename)
} catch {
    fatalError("Coudn't read or create \(filename): \(error.localizedDescription)")
}
Subtask 2: get data. Now we need another variable to hold the potential data fetched from JSON. so add another variable called data with the type of Data and make it optional, since maybe there’s no such a file in the document directory.
func read<T: Codable>(filename: String) -> T? {
    var file: URL
    var data: Data?
    //....
}
Once done, add assign the value of Data(contentsOf: file). This step is to get the file content as Data; as mentioned, there might be unexpected cases, so this function also can throw an error, hence wrap this line with do-catch too.
    do {
        data = try Data(contentsOf: file)
    } catch {
        print("Couldn't load \(filename) from main bundle or document directory :\n\(error)")
    }

    guard data != nil else { return nil }
Subtask 3 - decode the data
To convert data from JSON to map a Swift model, we can use JSONDecoder, which has a function decode to complete this step. Again, this function also can throw an error since it’s possible that the file we passed into the function is not a valid JSON file. If there’s no error, simply return the parsing result.
    //decode data (convert data to model)
    do {
        let decoder = JSONDecoder()
        print("Reading...  📖: \(file.description)")
        return try decoder.decode(T.self, from: data!)
    } catch {
        fatalError("Couldn't parse \(filename) as \(T.self):\n\(error)")
    }
The complete code of this function is below.
// Read data from JSON
func read<T: Codable>(filename: String) -> T? {
    var file: URL
    var data: Data?

    //get file directory
    do {
        file = try FileManager.default.url(for: .documentDirectory, in: .userDomainMask, appropriateFor: nil, create: true)
            .appendingPathComponent(filename)
    } catch {
        fatalError("Coudn't read or create \(filename): \(error.localizedDescription)")
    }

    //get data
    do {
        data = try Data(contentsOf: file)
    } catch {
        print("Couldn't load \(filename) from main bundle or document directory :\n\(error)")
    }

    guard data != nil else { return nil }

    //decode data (convert data to model)
    do {
        let decoder = JSONDecoder()
        print("Reading...  📖: \(file.description)")
        return try decoder.decode(T.self, from: data!)
    } catch {
        fatalError("Couldn't parse \(filename) as \(T.self):\n\(error)")
    }
}
Step 2 - Create a function to write data to a JSON file
(The code is provided step by step; scroll down to the end of step 2 for the complete function.)
Knowing how to read a JSON file, it’ll be much easier to write data to JSON. Similar to how we did for reading, we can downsize the workload of writing to two steps:
get file URL to write
encode the data array to JSON and save.
Let’s start with a generic function definition.
For reading, we need a model to conform to the Decodable or Codable protocol, and for writing, we need a model to conform to the Encodable or Codable protocol, as we need to encode the data model to JSON before write the encoded data to a file. So we can make the function generic with <T: Codable> and pass an array of the model, which is the data we’d like to save, and then the function needs the file name to write to.
func write<T: Codable>(array: [T], filename: String) {}
The next step, which is our subtask 1, is to get the file URL of the file we’re going to change. The code is the same as in the function above.
        var file: URL
        do {
            file = try FileManager.default.url(for: .documentDirectory, in: .userDomainMask, appropriateFor: nil, create: true)
                .appendingPathComponent(filename)
        } catch {
            fatalError("Coudn't read or create \(filename): \(error.localizedDescription)")
        }
As for encoding, we can use JSONEncoder. It has an encode function, in which we can pass the data array, and then call the write function and pass the file URL.
Note that if the file is not found, a new file with the name we provided will be created. So we don’t have to check if the file exists or not.
If you’re wondering what the line encoder.outputFormatting = .prettyPrinted means, it’s an optional formatting configuration, which makes the JSON format will be more readable with indented outputs.
        // encode the array with new entry and write to JSON file
        let encoder = JSONEncoder()
        encoder.outputFormatting = .prettyPrinted
        do {
            print("Writing...  📖: \(file.description)")
            try encoder.encode(array).write(to: file)
        } catch {
            print("Couldn’t save new entry to \(filename), \(error.localizedDescription)")
        }
Step 3 - Create an array of data
Now that we have the function of reading and writing JSON ready, let’s prepare some data to test them out.
Create a User struct, and make it conform to the Codable protocol, in order to work with JSON decoder and encoder, remember?
    struct User: Codable {
        var uid: UUID
        let name: String
        var createdAt: Date
    }
And after that, let’s create an array of users.
        let newUsers: [User] = [
            .init(uid: UUID(), name: "Josh", createdAt: Date()),
            .init(uid: UUID(), name: "Katy", createdAt: Date()),
            .init(uid: UUID(), name: "Logan", createdAt: Date()),
            .init(uid: UUID(), name: "Miguel", createdAt: Date())
        ]
Step 4 - Time to run!
Now we’re ready to check the functions. I’m doing this in a SwiftUI view to display the count of users before and after writing the file. You can do this in a preferred way like printing in the debug console and whatnot.
In my SwiftUI view, I have a state string info. When the view appear, I’m recording the count of users read from the JSON before and after writing new users.
struct ContentView_DemoLocalJSON20230227: View {
    @State private var info: String = ""
    var body: some View {
        Text(info)
            .onAppear {
                onAppear()
            }
    }

    func onAppear() {
        var users: [User] = read(filename: "DemoUsers20230227.json") ?? []
        let countOfUsersBeforeWriting = users.count
        users = [
            .init(uid: UUID(), name: "Josh", createdAt: Date()),
            .init(uid: UUID(), name: "Katy", createdAt: Date()),
            .init(uid: UUID(), name: "Logan", createdAt: Date()),
            .init(uid: UUID(), name: "Miguel", createdAt: Date())
        ]
        write(array: users, filename: "DemoUsers20230227.json")
        users = read(filename: "DemoUsers20230227.json") ?? []
        info = """
        Before writing:
        Total # of users: \(countOfUsersBeforeWriting)
        After writing:
        Total # of users: \(users.count)
        """
    }
}
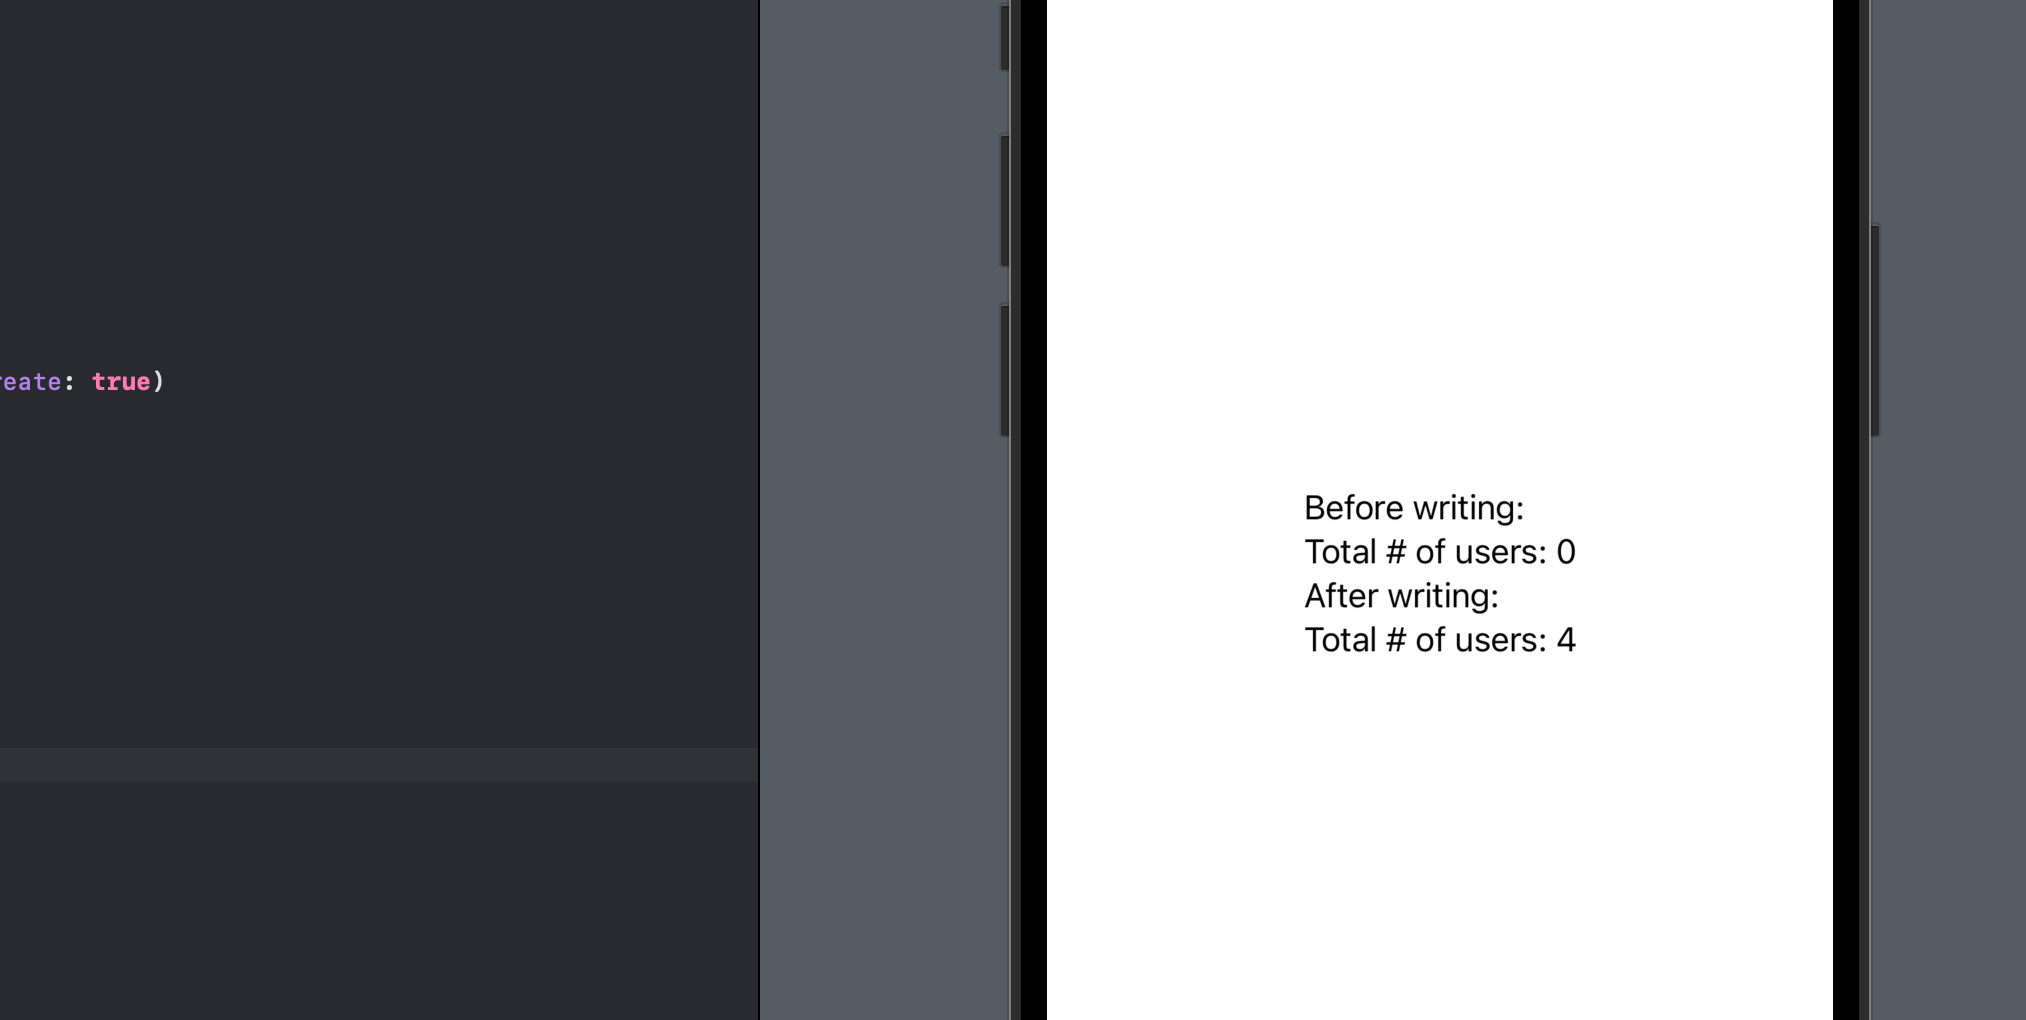
You can see that after writing, four new users are read from the JSON. Also, in the code in the reading and write functions, I’ve added a print statement to tell where the file path is located. So if you run the app in the simulator, you’ll get the file path in the debug console. Go to finder, press cmd + shift + G as in "Go to", paste the file path and hit enter, you can see the JSON file created. Select the file and press space to see the JSON content.

That’s everything for today. Hope you learned how to do JSON RW in Swift. If you find it helpful please leave a comment and remember to subscribe to my newsletter to get more posts like this.
See you all in the next post.


