SwiftUI List with Sort Options
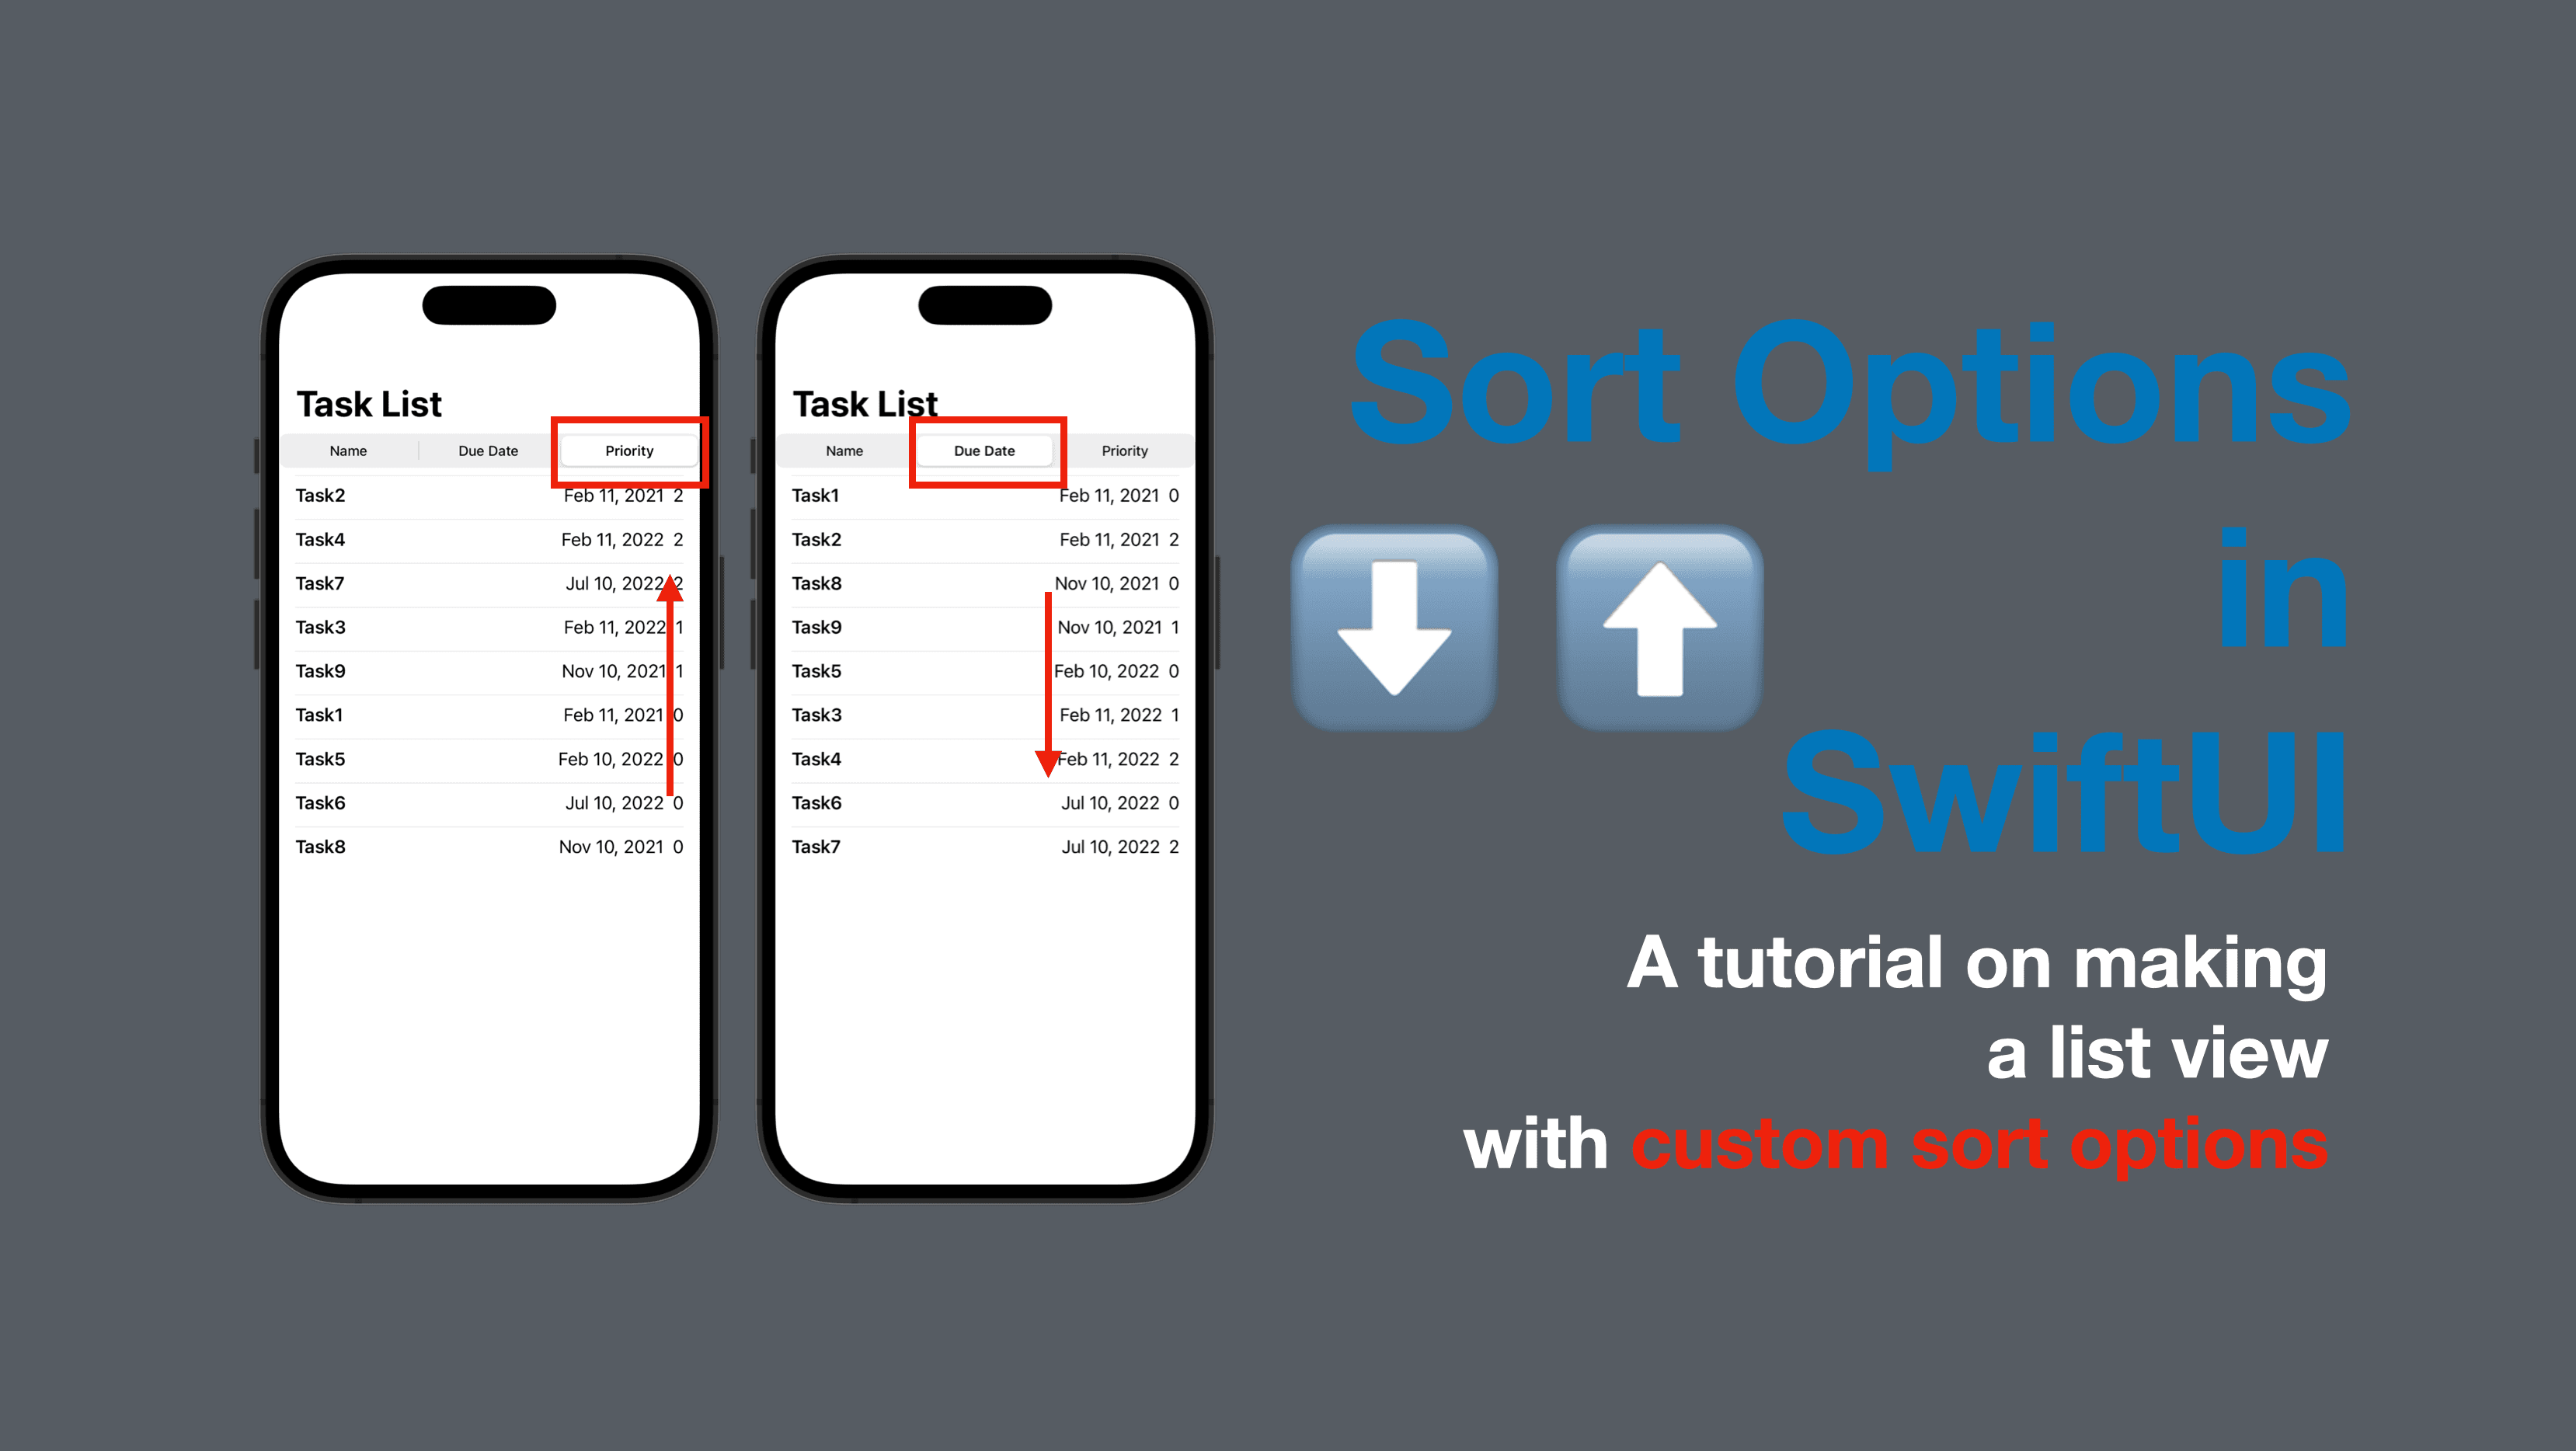
A common feature in apps is to allow users to sort a list of items based on various criteria such as name, date, or size. While SwiftUI provides built-in support for sorting by a single property, implementing custom sort options can be more challenging. In this tutorial, we'll learn how to implement custom sort options in a list using SwiftUI.
The code of this post is available here.
Step 1: Create a Model
First, let's create a simple model to represent the data we want to display in our list. In this example, we'll create a simple Task model that has a name, due date, and priority level:
struct Task: Identifiable, Hashable {
    let id = UUID()
    let name: String
    let dueDate: Date
    let priority: Priority

    enum Priority: Int {
        case low, medium, high
    }
}
Note that the enum of Priority is Int and the higher the value it has, the higher priority it represents.
Step 2: Create an array of tasks
Now let’s create an array of tasks, which is going to be our data source for the following steps.
To make it easier to initialize the dueDate values, we can define a function that converts a string with a date format to Date values.
func stringToDate(_ str: String) -> Date {
    let formatter = DateFormatter()
    formatter.dateFormat = "yyyy/MM/dd"
    return formatter.date(from: str) ?? Date()
}
Then create an array of tasks with different values of name, dueDate and priority.
let tasks: [Task] = [
    .init(name: "Task1", dueDate: stringToDate("2021/02/11"), priority: .low),
    .init(name: "Task2", dueDate: stringToDate("2021/02/11"), priority: .high),
    .init(name: "Task3", dueDate: stringToDate("2022/02/11"), priority: .medium),
    .init(name: "Task4", dueDate: stringToDate("2022/02/11"), priority: .high),
    .init(name: "Task5", dueDate: stringToDate("2022/02/10"), priority: .low),
    .init(name: "Task6", dueDate: stringToDate("2022/07/10"), priority: .low),
    .init(name: "Task7", dueDate: stringToDate("2022/07/10"), priority: .high),
    .init(name: "Task8", dueDate: stringToDate("2021/11/10"), priority: .low),
    .init(name: "Task9", dueDate: stringToDate("2021/11/10"), priority: .medium)
]
Step 3: Create a List of Tasks
Next, let's create a basic list view that displays our tasks. We can use the ForEach in SwiftUI to display our data:
struct ContentView: View {
    var body: some View {
        ScrollView {
            ForEach(tasks) { task in
                Divider()
                HStack {
                    Text(task.name).bold()
                    Spacer()
                    Text("\(task.dueDate.formatted(date: .abbreviated, time: .omitted))")
                    Text("\(task.priority.rawValue)")
                }
            }
        }
        .padding(.horizontal, 15)
    }
}
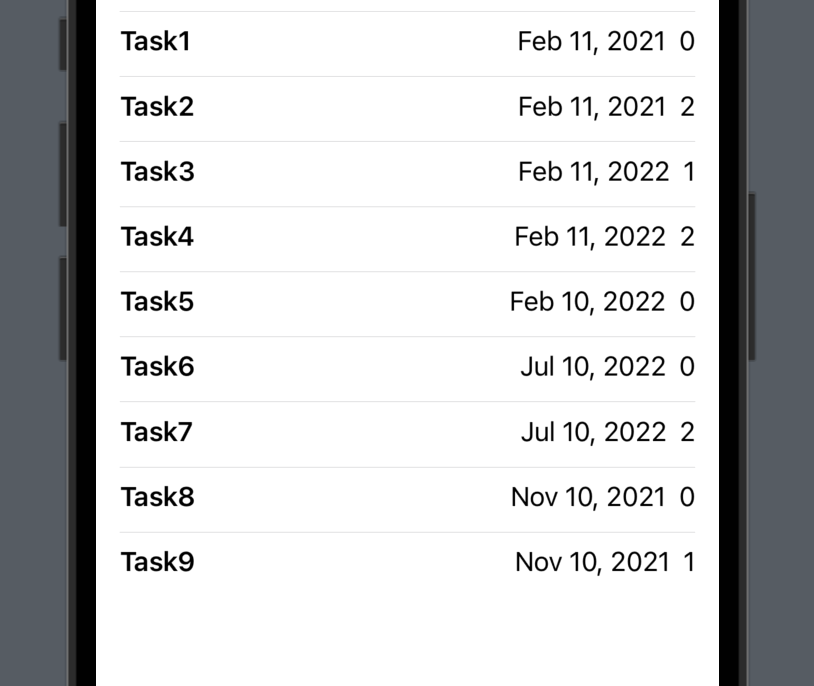
As you can see in the screenshot below, the preview presents the tasks in the order we created the array. (Note that it’s not sorted by name and you can change the name values in the array to double-check this).
Step 4: Add Sort Options
Now that we have a basic list, let's add support for custom sort options. We can do this by adding a Picker view to our view hierarchy that allows the user to select the sort criteria:
struct TaskListView2: View {
    enum SortOption {
        case name, dueDate, priority
    }
    @State private var sortOption: SortOption = .name
    var sortedTasks: [Task] {
        switch sortOption {
        case .name:
            return tasks.sorted { $0.name < $1.name }
        case .dueDate:
            return tasks.sorted { $0.dueDate < $1.dueDate }
        case .priority:
            return tasks.sorted { $0.priority.rawValue > $1.priority.rawValue }
        }
    }

    var body: some View {
        VStack {
            Picker("Sort By", selection: $sortOption) {
                Text("Name").tag(SortOption.name)
                Text("Due Date").tag(SortOption.dueDate)
                Text("Priority").tag(SortOption.priority)
            }.pickerStyle(SegmentedPickerStyle())

            ScrollView {
                ForEach(sortedTasks) { task in
                    Divider()
                    HStack {
                        Text(task.name).bold()
                        Spacer()
                        Text("\(task.dueDate.formatted(date: .abbreviated, time: .omitted))")
                        Text("\(task.priority.rawValue)")
                    }
                }
            }
            .padding(.horizontal, 15)
        }
    }
}
In the example above, we've added a Picker view that allows the user to select the sort criteria by name, due date, or priority. We've also created a computed property called sortedTasks that sorts the tasks based on the current sortOption. Remember to use the sortedTasks in the ScrollView ForEach (NOT the tasks array defined in Step 2.)
Step 5: Testing
Now that we have our custom sort options implemented, let's test them out. We should see the list updated as we change the sort criteria.
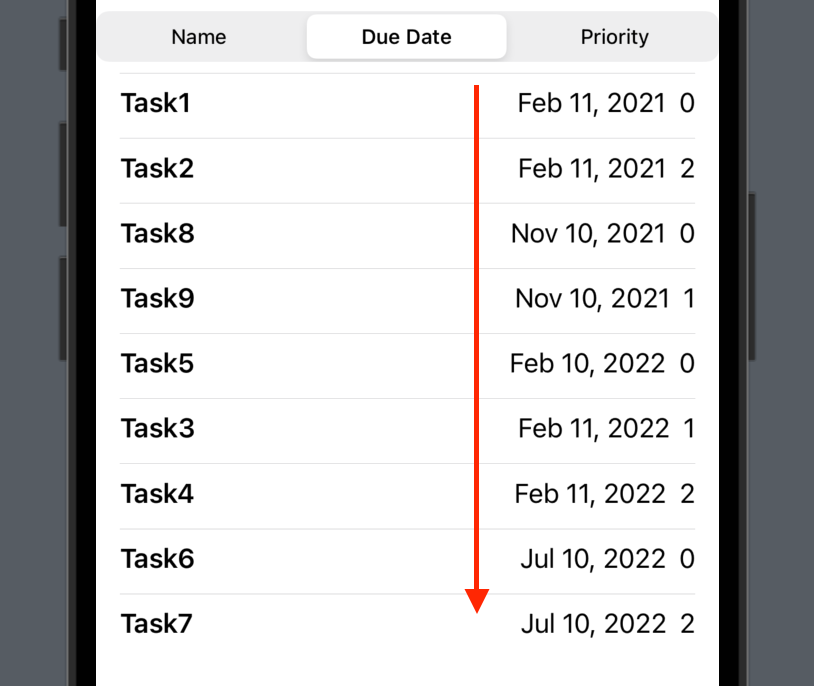
After we select the "Due Date" sort option, the list will present the tasks from nearer/older tasks due date to later.
Similarly, if the option "Priority" is selected, tasks with higher priority will be presented first.

Conclusion
In this tutorial, we've learned how to implement custom sort options in a list using SwiftUI. By adding a Picker view to our view hierarchy and creating a computed property that sorts the data based on the current sort criteria, we can give users the ability to sort data in any way they choose.
That’s all of today’s post. I hope it helps and let me know if it is by leaving a comment. Don’t forget to subscribe to my newsletter if you’d like to receive posts like this via email.
I’ll see you in the next post!


