@State in SwiftUI
A dissection of the @State property wrapper
Hi coders, in today’s post, I’d like to discuss the property wrapper @State in SwiftUI. Have you ever encountered the error Cannot assign to property: 'self' is immutable while trying to change a value of a property in SwiftUI view struct? Or you used a @State to work with a changing value but still not sure why a @State will do the trick. If yes, this post is for you.
The code used in this post is available here.
A quick look at how a SwiftUI view works
To understand the reason we need a state, let’s quickly take a look at the sample code below.
import SwiftUI
struct ContentView: View {
    var myString: String = ""
    var body: some View {
        VStack {
            Text(myString)
        }
        .onAppear {
            myString = "Show this in the contentview"
        }
    }
}
Try to run this code and you’ll see the error I mentioned at the beginning of this post.

What does this error even mean? Very good question!
The answer is that: this error has nothing to do with SwiftUI. Let’s see another example, without SwiftUI view.
This is a struct that has a stored property (a string, with a default value "") and a computed property, which is also a string. In the body of the computed property, there’s a line trying to modify the value of myString.
    struct TestStruct {
        var myString: String = ""
        var someComputedProperty: String {
            myString = "Hello world"
            return ""
        }
    }

Again this error shows up. We all know the reason: the stored properties in self are get-only. To change the value of such properties, the struct must be instantiated first.
Now let’s get back to a SwiftUI view. The error occurs for the same reason - SwiftUI View is basically a struct, with a computed property called body with a type of some View. Hence, we can’t just declare a stored property and try to update its value like in the first example above.
And that’s when the State comes in and has the say.
What does @State do?
@State is a SwiftUI property wrapper, with which we can modifier the values of a property inside the view struct. Let’s see how we can use it.
Let’s change the code in the content view, by simply add a wrapper @State in front of the property declaration.
Now you can see the error disappears and the preview loads without any issue. And note that instead of "Hello, World!", the text view is saying "Content View on appear...". Apparently State property wrapper helped us in two ways:
Allowed us to change the value of a property on the go;
Automatically updated the view when the value of the property is changed.
struct ContentView: View {
    @State var myStateString: String = "Hello, World!"
    var body: some View {
        VStack {
            Text(myStateString)
        }
        .onAppear {
            myStateString = "Content View on appear..."
        }
    }
}
How does @State work?
Now you might be wondering, why a simple @State in front of the property declaration will do the trick. Now let’s take a closer look.
State, as a property wrapper, is a generic struct with two computed properties:
wrappedValue- this is the actual value that’s held by the state property. ie in the example above, thewrappedValuewas initially "Hello, World!", and then got updated to "Content View on appear..." while the content view appears.projectedValue- this is the value we can use to pass the state to another view. We need a dollar sign$to access it. Let’s say we need a text field view for the user to input a username and any input should be held bymyStateString. Then we can useTextField("Enter your username", text: $myStateString).
        VStack {
            Text(myStateString)
            HStack {
                Text("User input: ")
                TextField("Enter your username", text: $myStateString)
                    .underline()
            }
        }
And one more thing: how do we initialize a state?
There are two initializers in the struct State:
init(wrappedValue: Value)
init(initialValue: Value)
Both initializers take our inputs and assign the value to the state as the wrapped value.
Another way
Now let’s try to play with State without the @State property wrapper to understand it better.
As mentioned above, State is a generic state. So we can define another string and make it "State" by explicitly writing its type: State<String>. And we can give it an initial value "Hello, World! - 2".
To access the value held by the state, we can use stateString2.wrappedValue.
And to use it as a binding, say for a text field view, we can use stateString2.projectedValue .
So let’s add a text field view and two text views, then two print statements in onAppear.
struct ContentView: View {
@State private var stateString1: String = "Hello, World! - 1"
private var stateString2: State<String> = State(initialValue: "Hello, World! - 2")
var body: some View {
VStack {
Text(stateString1)
//-------new lines here
HStack {
Text("User input: ")
TextField("Enter your username", text: stateString2.projectedValue)
.underline()
}
//-------new lines here
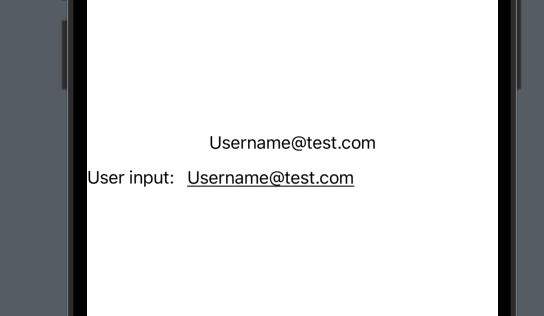
Text(stateString2.wrappedValue)
Text(stateString2.projectedValue.wrappedValue)
}
.onAppear {
stateString1 = "Content View on appear..."
//-------new lines here
stateString2.wrappedValue = "Content View on appear..."
print("Projected value: ", stateString2.projectedValue.wrappedValue)
print("Wrapped value: ", stateString2.wrappedValue)
}
}
}


You can see that
- onAppear of the content view, projected value and wrapped value is updated to "Content View on appear"
- the text views with wrapped value and the wrapped value of the projected value are both updated with the user input.
And that’s all of today’s post. I hope you understand State and the @State property wrapper better. If you find it helpful please remember to hit the like button or leave a common. For more posts like this via email, subsribe to my newsletter.
I’ll see you all in the next post!


