REST API Call in SwiftUI
Hi all, in today’s post, I’m going to demonstrate how to make a GET call to a RESTful API, fetch data from it and display the data in SwiftUI.
The code used in this post is available here.
Overview
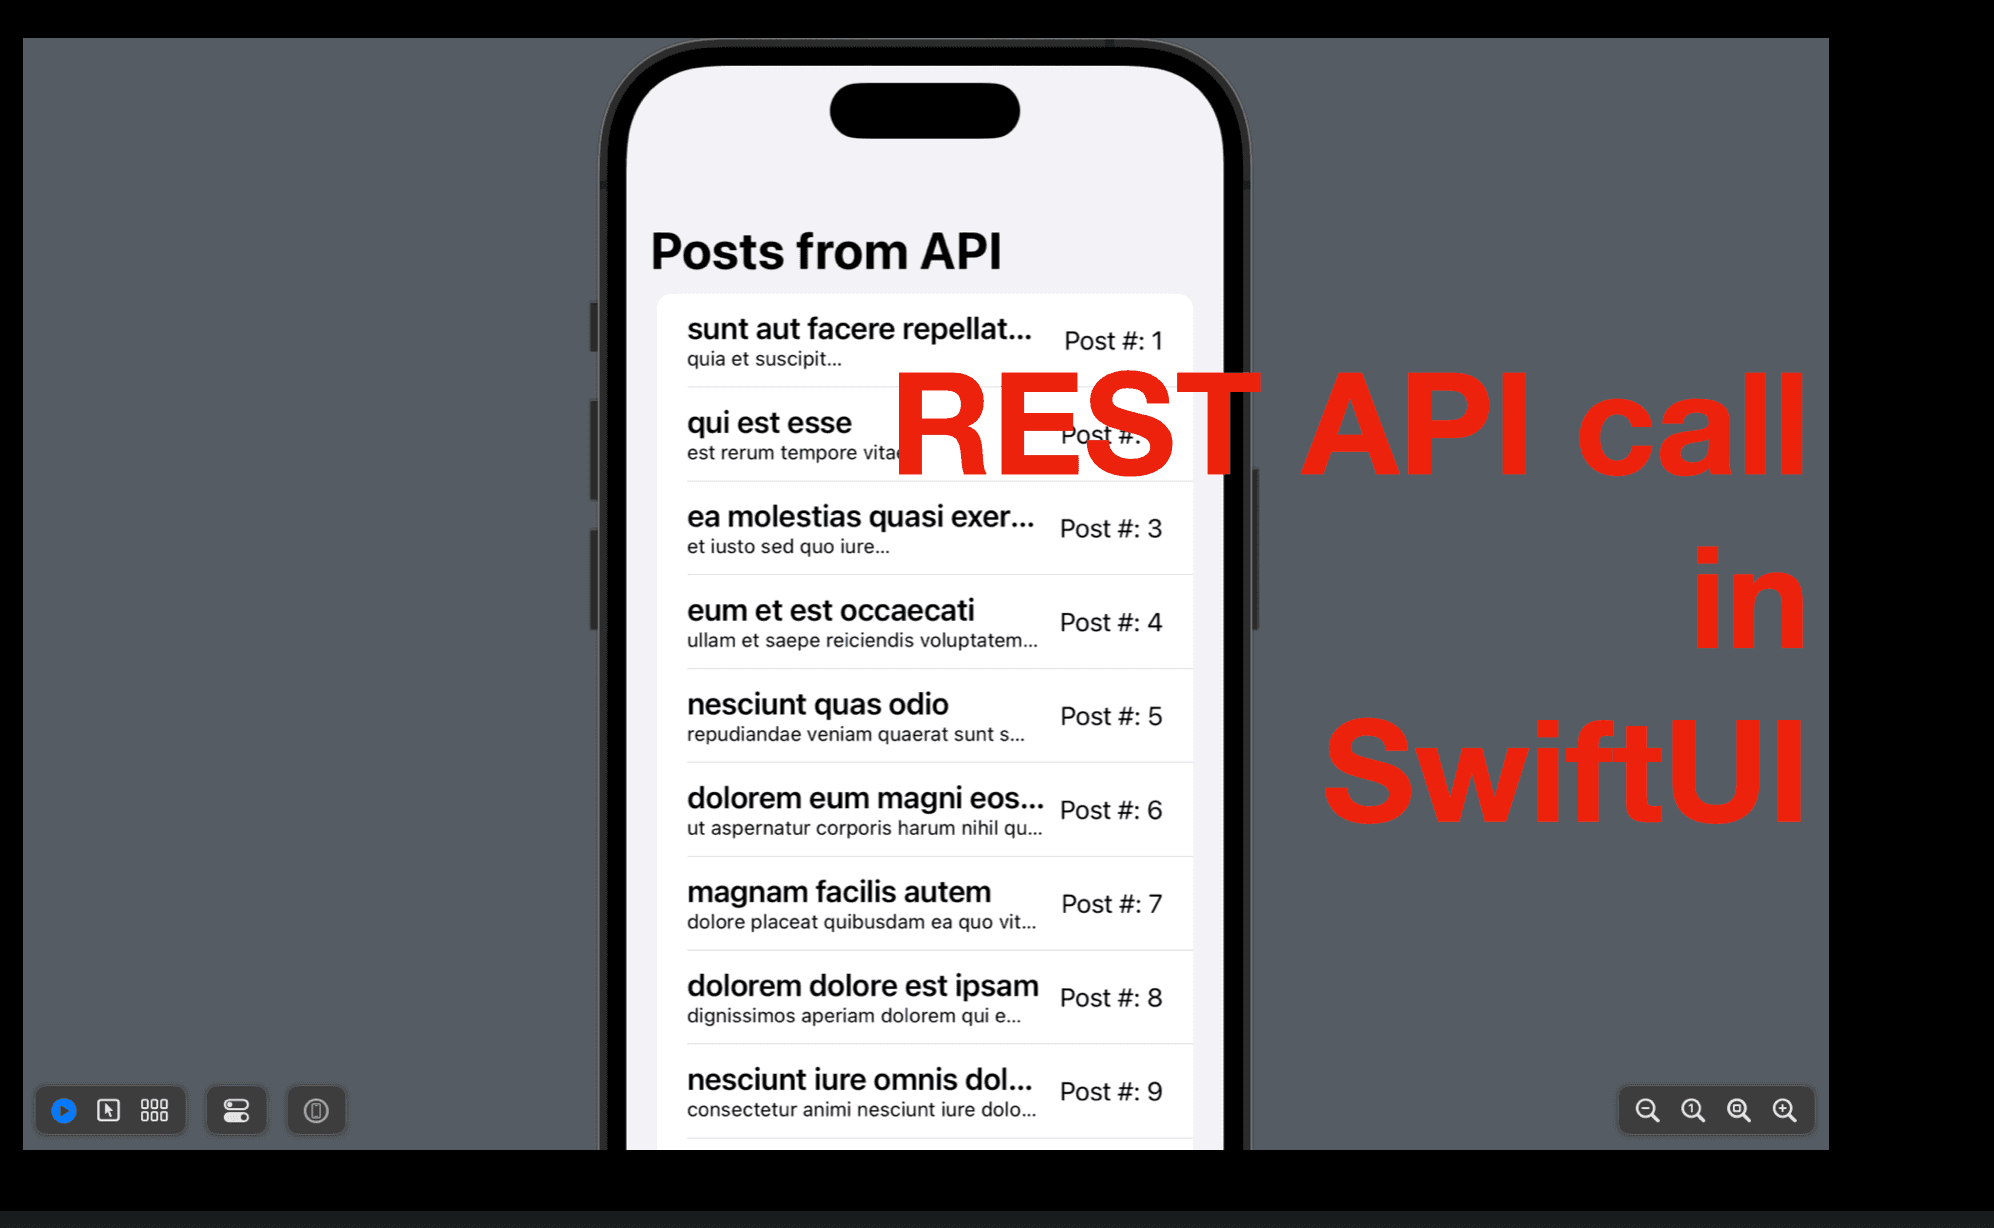
As you can see on the cover of this post, we’ll be building a simple app to make an API call to fetch a list of posts and display the post in a SwiftUI.
The steps to make a GET call are listed and briefly discussed below:
Define the data model. Most of the APIs transit data in the format of JSON, as it’s an easy-to-write and easy-to-read notation format with the support of custom objects. Hence, before we make a call, we’re supposed to read the sample response of the API or its documentation and create the model in Swift for the mapping processes later.
Define a function to make the API call and process the result. After we call the API, the API server will respond (if it works) with a result, which can be successful or failed. If the result is successful, we need to decode the JSON data sent by the server and consume it; in the case of failure, we need to handle the errors properly.
Build the view and invoke the function defined in Step 2.
Data Model
The URL string of the API we’re going to use today is: https://jsonplaceholder.typicode.com/posts. Let’s take a look at the JSON contents first. (The JSON string below contains the first two items only.)
[
  {
    "userId": 1,
    "id": 1,
    "title": "sunt aut facere repellat provident occaecati excepturi optio reprehenderit",
    "body": "quia et suscipit\nsuscipit recusandae consequuntur expedita et cum\nreprehenderit molestiae ut ut quas totam\nnostrum rerum est autem sunt rem eveniet architecto"
  },
  {
    "userId": 1,
    "id": 2,
    "title": "qui est esse",
    "body": "est rerum tempore vitae\nsequi sint nihil reprehenderit dolor beatae ea dolores neque\nfugiat blanditiis voluptate porro vel nihil molestiae ut reiciendis\nqui aperiam non debitis possimus qui neque nisi nulla"
  }
]
The JSON data is an array of posts. Each post has the following properties:
an integer, called
userIdan integer, called
id(ID for the posts)a string, called
title, anda string, called
body.
Now let’s create a Swift struct to map the model with this JSON response.
Note:
If a property in the JSON is not needed, we don’t have to define it in the Swift model struct. However, any property that’s contained in the Swift model struct must have a mapping/matching property in the JSON.
If there’re multiple properties of the same type, we can define them in one line. For instance, the definitions of
titleandbodybelow can be written aslet title, body: String.To encode an object to JSON, the model of this object must conform to the protocol
Encodableand to decode a JSON file to this object, the model of it must conform to the protocolDecodable. In many cases, both protocols are required, so we can make the struct conform to the protocolCodable, which is the combination ofEncodableandDecodable.If you need to present the objects of this struct in
ForEachorList, and it has a property with a value as its unique identifier, it’ll be easier if we make the struct conform to the protocolIdentifiable. (Not mandatory, explicitly set theForEachid withid: \.propertyNameorid: \.selfwill also work.)
    struct Post: Codable, Identifiable {
        let id: Int
        let title: String
        let body: String
    }
API Call
Now it’s time to define the function to make an API call. There’re three common places to define the function:
Inside the view. If this API call is used only in a specific view, we can define this private function directly within the view. To make the code clearer, you can put it inside an extension of the view (optional).
Inside the view model. If your project follows the MVVM pattern, it’s considered good practice to define the function in the view model. And in the view, you can invoke the function with
viewModelName.functionName.In a separate network manager. This is recommended if you have multiple entities (data models) in the project and API calls are needed at various places.
For demo purposes, let’s put the function inside the view and make it private.
First, let’s add a State property to held the list of posts to be displayed. It’s initial value will be an empty array. Once we have the function to call the API, we can populate it with posts when the view appears.
import SwiftUI
struct ContentView: View {
    @State private var posts: [Post] = []
    var body: some View {
        VStack {
            //...
        }
    }
}
Now let’s define the API call function.
Convert the string to URL. Use a guard statement to handle the case where the string doesn’t contain a valid URL.
Call the
dataTaskinURLSession.sharedto make the API call.URLSessionis an open class in Swift Foundation that works with various types of networking tasks.sharedis a get-only variable class insideURLSession, which make it easier to useURLSession- basically we can call functions inURLSessionwithURLSession.shared.followed by the function name, without creating a new URLSession object.The
dataTaskfunction has two parameters:URL, which expects the URL of our API;
a closure as the completion handler: which will process the data or handle the API call error, depending on the result.
If the API responds with data, we use the
decodefunctionJSONDecoderto parse it and convert it to an array of posts. If decoding is successful, the decoded data will be assigned to the state array of posts in our content view, or, in case of failure, an error will be printed.If the data is nil, we’ll print out the localized description of the error, if any.
!!!!! Note that the
dataTaskfunction returns aURLSessionDataTaskobject only. To actually perform the task, we need to call theresumefunction in theURLSessionDataTaskclass. That’s why there’s a.resume()after the end of the closure.
private func fetchData() {
    //Parse URL
    guard let url = URL(string: "https://jsonplaceholder.typicode.com/posts") else { return }
    URLSession.shared.dataTask(with: url) { data, _, error in
        if let data = data {
            do {
                //Parse JSON
                let decodedData = try JSONDecoder().decode([Post].self, from: data)
                self.posts = decodedData
            } catch {
                //Print JSON decoding error
                print("Error decoding JSON: \(error.localizedDescription)")
            }
        } else if let error = error {
            //Print API call error
            print("Error fetching data: \(error.localizedDescription)")
        }
    }.resume()
}
Build the view
Now let’s build the view. We need a list with posts as the data source. Since our Post struct conforms to the protocol Identifiable, we don’t need to specify the item ID here in the view. For each Post item, we need a row. So give it an HStack, with a VStack inside, to display the title and the post body. Then a spacer and finally a text view to display the post ID.
Last but not least, add the onAppear modifier and call our fetchData function.
struct ContentView_DemoRESTAPI20230305: View {

    @State var posts: [Post] = []
    var body: some View {
        NavigationStack {
            List(posts) { post in
                HStack {
                    VStack(alignment: .leading) {
                        Text(post.title).bold().lineLimit(1).font(.title3)
                        Text(post.body).lineLimit(1).font(.footnote)
                    }
                    Spacer()
                    Text("Post #: \(post.id)")
                }
            }
            .navigationTitle("Posts from API")
            .onAppear {
                fetchData()
            }
        }
    }
    // functions and models
    //....
}
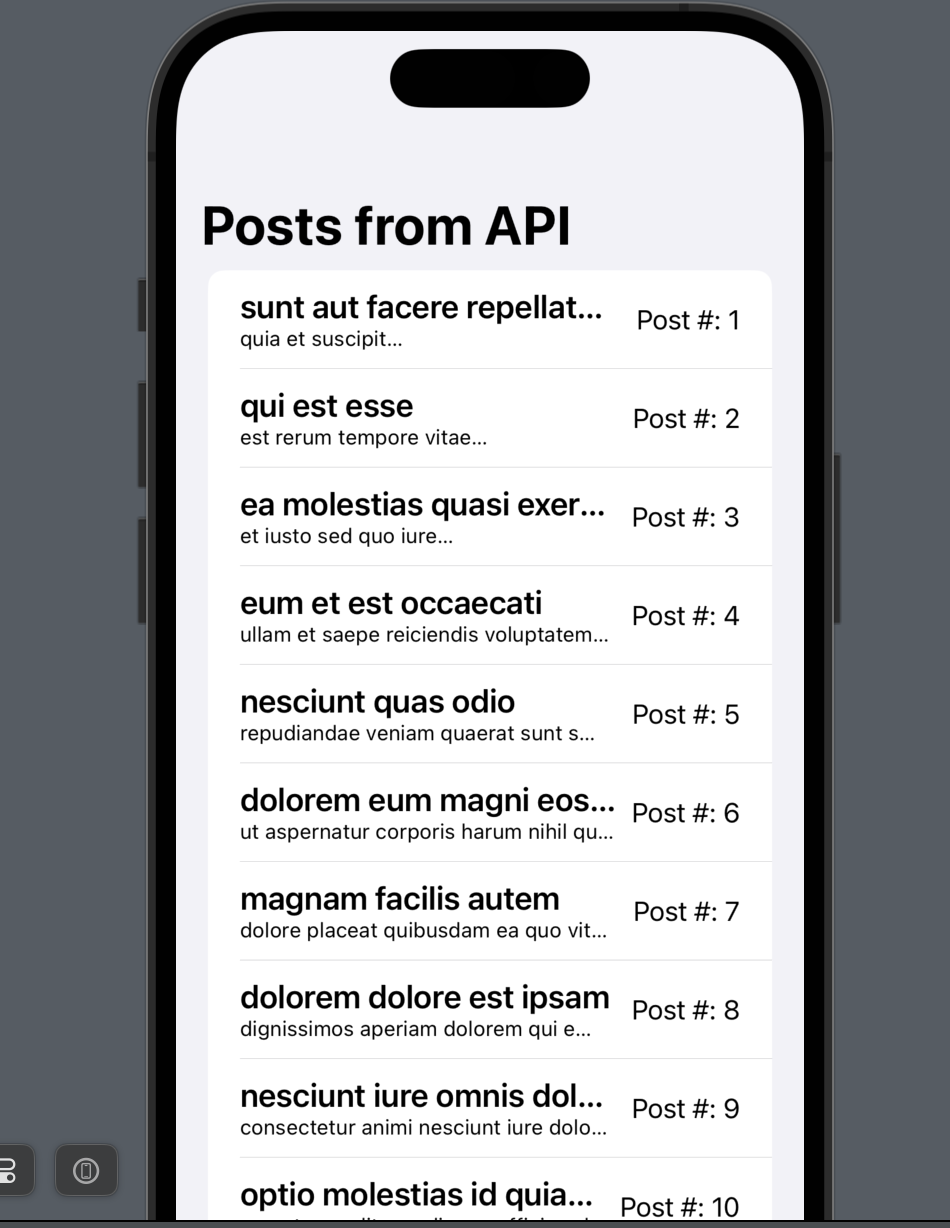
Once done, you should be able to see the list populated with a bunch of lorem ipsum-styled posts in the preview provider.
That’s all of today’s content. Hope you understand how API call works and how to do that in SwiftUI. If you find it useful, don’t remember to hit the like button and subscribe to my newsletter. Leave a comment if you got any doubts.
I’ll see you all in the next post.


